Showing posts with label Tea-Time Snack. Show all posts

Tuesday, June 11, 2013

Fresh Ajwain / Carom Leaves Fritters


Its been raining often in chennai and the weather was perfect to out try this fragnant bajji/fritter. The plant is not sold in markets but can be found in almost all indian home kitchen gardens.

The fritter has a golden translucent green texture that is very mystifying that will make you enjoy every bite. The leaf has a strong fragnance which will get infused with the fritter.

Ingredients
  • 1/2 cup besan / chickpea flour / garbanzo flour
  • 15 ajwain / vammu / omam leaves
  • 1/2 tsp chilli powder
  • 1/2 tsp ginger garlic paste
  • oil for deep fry
  • pinch of cooking soda
  • salt to taste


Procedure

Wash the leaves properly and keep aside
Mix all the ingredients except the leaves to a slow flowy semi thick paste Heat oil in a pan, dip each leaf in the batter and slide the leaf on both side of the edge of bowl to discard the extra batter.

Slowly drop it into the oil and repeat the same for other leaves. Deep fry in medium flame till you get a nice golden crust on both sides. Put them in a plate with a paper towel that will absorb all the extra oil


Note:

If you like your fritters with more batter then you can drop them directly into oil without sliding the leaf on the edge bowl to get thicker fritters.


Oil should properly heated neither too hot or too less before you drop the fritter otherwise they will absorb too much oil.

To test the heat when you drop batter it should sizzle and float immediately without drastic change in color

You can replace awjain with spinach leaves too
 

Monday, May 27, 2013

Khaman Dhokla a Savory Steamed Cake

Dhokla can be eaten for breakfast or as a main course or as a snack. It is fluffy spongy and porous and a signature dish of gujarati cuisine. I served the dhokla with a sweet, spicy, tangy ginger tamarind chutney.

Ingredients
  • 1 cup chickpea flour/besan
  • 1/2 cup curd
  • 1/2 cup water
  • 1/2 tsp lemon juice
  • 2 green chillies fine chopped
  • 1/4 tsp turmeric
  • 1/2 tsp cooking soda or baking soda
  • 1 tbsp oil
  • 1 tsp sugar
  • 1 sachet eno powder
  • salt to taste
For tempering
  • 1 tsp oil
  • 1/4 tsp mustard seeds
  • 1/2 tsp sesame seeds
  • 1-2 springs curry leaves
  • 1 tbsp grated coconut
  • 2 chopped green chilli
  • pinch of asafoetida/hing
  • 1/4 cup water
Procedure
Mix the besan with curd and water until it is lump free with a consistency like idli batter, it should not be too flowy.Now add turmeric powder and soda and mix nicely, let is rest for 20 min

After 20 min the batter will rise, to this mix oil, lemon juice, salt, sugar, chopped green chillis and mix nicely. Meanwhile prepare your steamer or pressure cooker (place a bowl with water and then a plate which will hold the batter, I used baking tray instead of a plate).

Once the water starts bowling prepare the batter by mixing the eno to it nicely and pour into the plate immediately, because of adding eno you will find lot of bubbles in batter.

Steam for 5-7 minutes, remove the lid of pressure cooker and check with tooth pick, if it comes out clean your dhokla is ready for tempering. Switch off the gas and let it cool for 5 min, in the meantime prepare your tempering

Heat oil in a pan, add sesame seeds, mustard seeds, curry leaves, chopped green chilles, when mustard start spluttering remove from gas and add 1/4 cup water to this and pour this tempering over the prepared dhokla and also sprinkle the grated coconut. 

Let it rest for five more minutes and cut it into a desired shape and size and serve with tamarind chutney or hari chutney


Ginger Tamarind Chutney

Ingredients
  • 1 lemon size tamarind
  • 1 lemon size jaggery chunk
  • 2 green chilli
  • 1 spring curry leaves
  • 1 tsp chopped coriander/cilantro
  • 1/2 inch ginger
  • 1/4 tsp jeera/cummin seeds
  • pinch of turmeric
  • pinch of asafoetida
  • salt to taste
Make a smooth paste of all the above ingredients if required add little water and serve

Note:
1. Batter should not rest even for a min after adding the eno

2. If you prefer more sweetness in your dhokla then while preparing the tempering add 1 tsp of sugar to it. 

Saturday, April 27, 2013

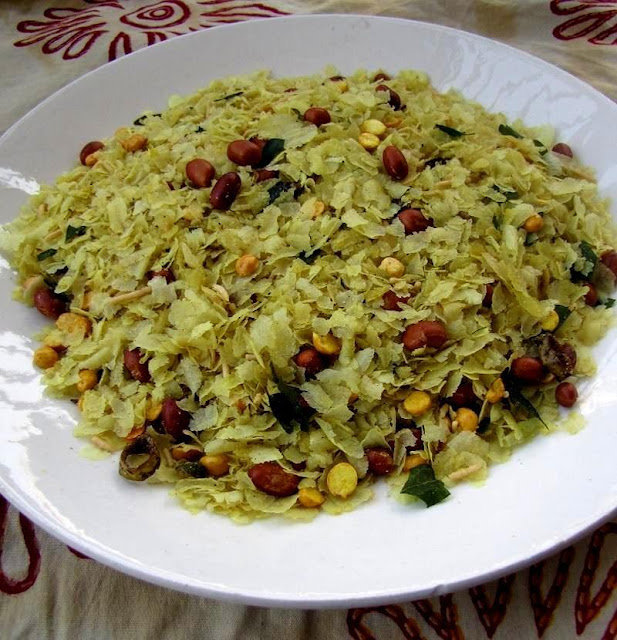
Anytime Munch Rice Flake Mixture

Its summertime and the last place you want to be is the kitchen, kids are always demanding in these moments for a snack and there can be no better option to delight them with this light and crispy popular snack mixture.

Using microwave is a healthier option to prepare this snack without compromising on the taste

Ingredients
  • 2 cups superfine rice flakes/chivda/atukalu/aval
  • 1/4 cup peanuts
  • 1/4 cup roasted dal
  • 2 tbsp rice bran oil
  • 3 springs of curry leaves
  • 6-7 chopped green chillies
  • 1/4 tsp mustard seeds
  • 1/2 tsp cummin/jeera seeds
  • 1/8 tsp turmeric
  • 1/2 tsp chilli powder
  • 1/4 tsp chat masala
  • pinch of hing
  • salt to taste
Procedure
Microwave the rice flakes stiring every one minute until it turns crispy in a
microwave safe bowl for approximately 10 ten minutes. Keep an eagle eye else it may burn. Keep aside

Heat oil in a pan add cummin seeds,mustard seeds,hing and once it splutter add curry leaves, green chillies, peanuts and fry in a medium flame till peanuts roast properly.Then add the fried gram stir for 30 seconds and then the beaten rice, salt, turmeric, chilli powder , chat masala and stir until it blends completely

Let it cool and store it in a airtight jar to enjoy with a hot cup of tea anytime.

Saturday, December 8, 2012

Lip Smacking Bread Upma in a Jiffy

This month of kartik is a special month and generally cooking with onions and garlic is avoided, it is very difficult to explain this to other people but you can get a clue from chef kurma das a devout vaishnava. And with my mom who has come to visit me it becomes more special to treat her different varieties of food as she restricts her diet during this month without onions and garlic. This morning I prepared bread upma . It is very simple to prepare and can be made in a jiffy. It looks colorful too and  I am sure you would love its taste.

Ingredients:
  • 7 slices bread ( I used 5 slices brown bread and 2 white)
  • 1.5 cup chopped veggies (cauliflower, carrot, potato)
  • 1/4 tsp jeera / cummin seeds
  • 2 tbsp tomato ketchup
  • 1/2 cup tomatoes
  • 3 slit green chilies
  • 1 tbsp chopped cilantro/coriander 
  • 2 tbsp oil
  • salt to taste
Cooking Procedure
Dice each slice of bread to 1 cm cubes (12 pieces).Heat a pan and put these cubes into it and dry toast it, and keep it aside.

Heat oil in the same pan, add cumin seeds, chilies  then add the chopped veggies and fry till they become tender. 


Then add tomatoes and cilantro/coriander and cook until it becomes soft. 

Add salt and tomato ketchup and mix nicely, then add the bread cubes and stir it fast because the mixture should be blended with all pieces.


Sunday, October 28, 2012

Saggubeeyam Majjiga Jantikalu / Sago Crispies


With dewali just around the corner I prepared one of my favorite snacks today, a traditional savory andhra snack whose main ingredients are curd and sago.

Its crunchy and tangy flavor and the little pearls that burst out at the end give it a very unique appearance.

Ingredients

  •     4 cups homemade rice flour
  •     1 cup Saggubeeyam (Sago/Sabudana/Tapioca)
  •     2 cups curd
  •     10-15 medium size green chilles paste
  •     2 tbsp roasted channa dal powder
  •     salt to taste
Procedure

Soak the rice for 4 hours, drain the water completely and pat it dry and make it a fine powder. Keep aside

Soak the sago in 1 cup curd for 2 hours.

Now mix the rice flour, soaked sago , green chillies paste, salt, roasted channa dal powder nicely. Then add little by little curd and check the consistency.Blend nicely until the prepared dough should not stick to the side of the vessel.

Heat oil to fry in a deep bottom pan,set the three hole plate in the jantikalu gottam/murukku press and now fill the dough in jantikalu gottam and slowly press one inch over the hot oil.


Fry on medium flame and flip it occasionally till it becomes golden brown and looks crispy. Remove it and place on a paper towel to absorb the excess oil.


Store it a air tight container once its completely cooled.

Note:

1. Oil should be properly heated initially medium to high flame and it should not be too hot as it will get charred and if too cold will not fry properly.

2. Adding roasted channa dal powder makes it more crispy.

3. The green chilli paste should be very fine otherwise it will stick to the plate inside the murukku press and dough will not come out smoothly

4. Sago should be properly soaked.To check if it is soaked properly press it between your fingertips and it should be completely soft.

Wednesday, June 13, 2012

Pesara Pindi Bellallu / Green Gram Bubbles


A traditional dish always brings back sweet memories of childhood.And my mom was a expert to dole out so many savory dishes throughout the year.She ensured every season and moment had a special dish.She recently came over and I requested her to prepare this savory green gram bubbles tradionally known as pesara pindi bellallu. The texture and flavor of this savory evening snack can make your family rejoice the moment.The best part is it should be eaten warm with unlimited servings of ghee.!!So enjoy this savory snack my mom has prepared for me and my hubby.

Ingredients
  • 1 cup rice flour
  • 1 cup green gram flour/moong (see the note)
  • pinch of hing
  • 1/2 tsp chilli powder
  • 1/4 cup sesame
  • oil to fry
  • salt to taste
  • ghee for accompaniment

Procedure
Mix all the above ingredients except sesame. Add enough water to it into make a nice soft dough.Divide the dough into equal part of medium size balls.Sprinkle sesame on each ball.On a plastic sheet take each ball and press it firmly to shape it in a round shape. Heat oil in a pan and deep fry it on a medium flame till each side is golden brown. Serve warm with a dash of ghee.
Note: 
1. To make green gram flour grind it into a fine powder and sieve it. 
2.While pressing each ball do not press to much, it should be little thick for it to bubble.

LinkWithin

Related Posts with Thumbnails