Sunday, May 6, 2012

Secret Wonders of Rice Bran Oil

I have been using sunflower oil,mustard oil and olive oil for all my cooking but recently I have included rice bran oil too. I found  this oil in the reliance fresh store and did a little bit of research. I am amazed by its nutritional benefits and find it hard to ignore. I wanted to share my research on this oil as I am sure we are all too biased by advertising and need to realize other healthy alternative cooking oils.

Rice bran oil (also known as rice bran extract) is the oil extracted from the germ and inner husk of rice. It is notable for its high smoke point of 213 °C (415 °F) and its mild flavor, making it suitable for high-temperature cooking methods such as stir frying and deep frying.It is popular as a cooking oil in several Asian countries, including Japan and China

Higher Smoking Point, Less Greasy and More Flavor
As rice bran oil has the highest smoke point of any vegetable oil, it is better suited to cooking at high heats and is less likely to bind with foods, making food cooked with rice bran oil less greasy than that cooked with sunflower oil. Due to its rich, nutty taste, rice bran oil may be preferred where additional flavor is desired.
Read more: http://www.livestrong.com/article

Vitamin E and Oryzanol
Rice bran oil beats olive oil in its vitamin E power, as it contains both the tocopherol and tocotrienol forms of the vitamin, whereas olive oil contains only the tocopherol form -- and less of that than rice bran oil. Additionally, rice bran oil contains significant amounts of the antioxidant oryzanol, whereas olive oil has none.

It helps to lower LDL or bad cholesterol and does not lower the good cholesterol as sunflower oils do and is known to reduce the risk of cardiovascular diseases.
Source: http://nutrihealth.in/food/health-benefits-of-rice-bran-oil/

The rice bran oil component γ-oryzanol was shown in Japan to be effective in relieving hot flashes and other symptoms of female menopause. Researchers found that 90% of the women found some form of relief from hot flashes after taking a rice bran oil supplement for 4–6 weeks. 
Source: http://en.wikipedia.org/wiki/Rice_bran_oil

Lowers Cholesterol
Rice bran oil contains gamma oryzanol, a group of ferulate esters of triterpene alcohols and phytosterols that have been linked to many health benefits. Gamma oryzanol is effective in reducing plasma cholesterol and reducing cholesterol absorption, decreasing early atherosclerosis. In addition, gamma oryzanol inhibits platelet aggregation that could lead to blood clots. Rice bran oil contains tocotrienol (a form of Vitamin E) which has been found to inhibit the activity of HMG-CoA reductase, an enzyme that synthesizes cholesterol, a major factor in heart disease. In a study conducted at the University of Rochester, Mohammad Minhajuddin, Ph.D., and researchers determined that the tocotrienol in rice bran oil reduced cholesterol in rats up to 42 percent while lowering LDL cholesterol up to 62 percent.

Anti-Cancer Effects
Rice bran oil contains significant levels of both gamma and delta tocotrienols (approximately 500 ppm), forms of Vitamin E, that have been found to be able to accumulate in cancer cells and kill the tumors. In a study conducted at Kyushu University in Japan, researchers looked at the effects of tocotrienols on mouse cancer cells. There was a significant delay in growth in the cancer cells. "Our results suggested that accumulation is critical for the anti-tumor activity of tocotrienols," said Japanese lead researcher, Yuhei Hiura, reporting in "The Journal of Nutritional Biochemistry."

Skin Protector
Originating in the Japanese culture, skin care with rice bran oil is becoming more popular. To this day, one of the highest compliments a Japanese woman can receive is to be called a "nuka bijin" which means "a rice bran beauty." Having smooth healthy skin is due to the oryzanol in the rice bran oil that whitens the skin slightly. As the skin is exposed to sunlight, the rice bran oil reacts as a sunscreen protecting the skin from harmful ultraviolet rays. The oryzanol impedes melanin pigmentation by restraining the erythema activity of tyrosinase as it stops the ultraviolet rays' transmission at the skin's surface. The use of rice bran oil in sunscreen products and hair conditioners is on the increase in the United States.

Antioxidant Packed
Rice bran oil contains three healthy antioxidants useful in protecting the body's cells against the effects of free radicals--tocopherol, tocotrienol and oryzanol. In addition, rice bran oil does not require hydrogenation for stability and has a high percentage of fatty acids (oleic, 46 percent; linoleic, 36 percent; and linolenic, 1 percent). Antioxidant companies have switched their basic oil to rice bran oil. This movement is an indication that industry leaders recognize rice bran oil's lipid oxidative stability. Lipid oxidative stability is important in the prevention of pathologic processes such as cardiovascular diseases, arthritis and inflammatory processes.
Read more: http://www.livestrong.com/article/25408-health-benefits-rice-bran-oil/#ixzz1u4lCnqkZ


Tuesday, May 1, 2012

Tasty Paneer Paratha with Zesty Hari Chutney


Stuffed Parathas can made in many different variations . They are very healthy and loved by children and can be had for breakfast and dinner. This version with paneer has a unique softness that can simply make you enjoy every bite.

Hari chutney is the perfect accompaniment for these paneer parathas which have a mild flavor. Coriander is blended with some unique aromatic spices that make it more zesty. 

Preparation Time: 20 min
Cooking Time: 30 min
Serves: 6 parathas

Ingredients:
  • 2 cups atta
  • 1/4 tsp ajwain
  • 1/2 tsp oil
  • pinch of salt
For stuffing
  • 1 cup grated paneer/cottage cheese
  • 1/2 cup fine chopped onions
  • 3 tbsp finely chopped cilantro/coriander
  • 4 finely chopped green chillies
  • 1/2 inch grated ginger
  • 1/2 tsp amchur powder
  • salt to taste

Preparation

Making Dough for paratha

Take flour,mix salt and ajwain to it then add three-fourth cup of warm water gradually, knead to make a smooth dough. And keep aside for 15 min.

To make filling
Mix all the above ingredients of filling nicely and keep aside

Making the paratha

Break the dough in 6 equal portions,roll each portion in a ball and flatten it by pressing.

Place 1 1/2 table spoon of stuffing on it and enclose it.Seal the edges completely so that stuffing does not come out.

Flatten again, sprinkle a little flour and roll them with a rolling pin to approximately six-inch diameter.

Heat a frying pan(tawa), place paratha on it and cook on moderate heat for three minutes.

Turn it and pour half a tablespoon of oil, spread it on paratha and shallow fry over low heat.

Turn it and again pour half a tablespoon of oil on other side, cook on low heat till golden brown

Serve hot with fresh coriander chutney

Hari Chutney


Ingredients
  • 1 big bunch corainder leaves
  • 1 small chopped tomato
  • 4-5 garlic pods
  • 1/2 inch ginger
  • 1/2 tsp cummin/jeera seeds
  • 1/4 tsp black salt
  • 1/4 tsp amchur powder
  • 2 green chillies
  • pinch of asafoetida/hing
  • salt to taste
Procedure

Blend all the above ingredients into a fine paste and serve with any stuffed paratha

Tuesday, April 24, 2012

Spicy Smoked Brinjal for a Lazy Day


This is a dish I learnt from my hubby.Perfect to have on any lazy day when we dont want to be in the kitchen for too long !!So simple to prepare and yet so relishable to eat with plain curd rice or hot steaming rice with a dash of ghee.

The smoky flavor of the brinjals has a unique taste thats hard to describe but taste wonderful. I am sure you would enjoy it too.

Ingredients
  • 6 medium sized lengthy brinjals
  • 1.5 tsp salt
  • 2 tsp chilly powder
  • 10 tsp olive oil
Procedure

Partly slit the brinjal along the length partly on one side. Rub a few drops of oil over each brinjal.Place them over the medium flame and slowly roast them turning them on all the sides evenly all over.


While the brinjals are being smoked take a small dish and mix the salt, chilli powder and olive oil into a soft smooth paste.

Once the brinjal are smoked and tender when pressed softly take them off the flame . Fill each brinjal along the length with about 1 tbsp of the paste prepared.

Serve the brinjals with curd rice or with hot rice with a dash of ghee and enjoy your lazy day.

Tuesday, April 17, 2012

Savory Buns For A Snack

Its been ages I did baking and so today I decided to bake something simple and special which will not go wrong !! For these savory buns I took the basic recipe from my stuffed buns and added some magical spices and the outcome was so exciting to watch. I am sure you will have much fun baking these savory buns and enjoy them with a warm cup of tea ..

Ingredients
  • 1 n 1/2 cups all purpose flour
  • 1 n 3/4 tsp active dry yeast
  • 1 tbsp sugar
  • 3/4 tsp salt
  • 1 tbsp chilli flakes
  • 1/2 tsp roasted cumin powder
  • 1 tbsp chopped garlic
  • 1 tbsp chopped cilantro
  • 1/2 cup warm milk
  • 2 tbsp warm water
  • 3 tbsp oil
For greasing the buns
  • 1/2 tsp milk
  • 1 /2 tsp oil
Step 1: Making the Dough

In a big bowl add yeast,sugar,salt n warm water let it sit for 10 min. It will become foamy. Then add oil , milk,chilly flakes,cumin powder,chopped garlic and chopped cilantro n mix nicely. Then add flour slowly 1/2 cup at a time n stir with spatula. Then take it out of the bowl n on a lightly floured surface knead it for 5 min n then make it into a ball. Grease it with oil then put it in a bowl n cover with a damp cloth n let it sit for 1 hr.

Step 2: Shaping
After a hour or till the dough become double.Take it out n punch it in the center to take all the air out.Now divide the dough into six parts n shape it into six to eight balls accordingly n let it sit for another 10 min.

Step 3: Baking

Preheat the oven at 350 F 15 min before baking n bake these buns for 15 min or till they golden brown.

Serving Procedure
Serve the buns once they cool or store them in a fridge reheat in microwave for 10 seconds or cut the bread horizontally, toast it on pan ,apply some butter n serve warm with a cup of tea.

Saturday, April 7, 2012

Flavorful Drumstick Curry


Drumsticks pods and leaves are available all thoughout the year.

The pods are excellent cardio-protectors as they contain certain hypotensive compounds like thiocarbamate and isothiocyanate glycosides which help to lower blood pressure along with potassium. The fiber in the pods helps to lower cholesterol and prevent arterial clogs, thus reducing incidence of heart attacks and stroke
Source:http://blog.caloricious.com/2011/06/06/health-benefits-of-drumstick/

In south india it is very common to make dishes with drumstick, this curry is a flavorful combination of drumstick and cashew. It has a mild creamy flavor and the drumstick curry is a excellent accompaniment to rice.I am sure you will enjoy it

Ingredients
  • 5 drumsticks chopped at 4 inch length
  • 2 cups sliced onions
  • 2 cup diced tomatoes
  • 8 cashew nuts
  • 6 cloves garlic
  • 1/2 inch ginger
  • 1 tbsp coriander powder
  • 1/2 tbsp cummin powder
  • 1/4 tsp turmertic powder
  • chilly powder to taste
  • salt to taste
  • 2 tbsp oil
Procedure

Boil the chopped drumsticks for 10 min in a microwave with enough water that it may all just float and keep aside and dont discard the water.

Heat 1 tbsp oil in a pan, add the onions and cashewnuts and fry till onions become translucent

Add garlic ginger and fry for 2 minutes, then add tomatoes and let it cook till it becomes soft.

Let the above mixture cool and then grind it to a smooth paste.

Heat another 1 tbsp in the same pan, added this grinded mixture and all the above mentioned powders , stir nicely.

Then add the drumsticks and stir nicely, add the drumstick water and let it cook for another 10 minutes in a low flame. Check the consistently and add little water if required. Serve hot with rice

Thursday, April 5, 2012

Simply Yummy Idly Fry


Idly fry has been one of my favorite quick and tasty delicacies to prepare, however they tend to be very oily in restaurants. So today I decided to prepare a healthier version with less oil and also make it tasty to eat.

Ingredients
  • 6 idlis
  • 1 cup diced capsicum
  • 1 cup diced onions
  • 1/2 cup diced tomatoes
  • 2 chopped green chillis
  • 2 table tomato sauce
  • 1/4 tsp black pepper powder
  • 1/4 tsp garam masala
  • salt to taste
  • 2 tbsp oil
Prodecure

Cut the idly into medium size chunks. Heat 1 tbsp oil in a pan and saute the idly in high flame until it has a crispy golden brown exterior. Keep aside

Heat another tbsp oil, add the onions, green chilli and saute for a minute, then add capsicum stir for another 1 min. Then add tomatoes and tomato ketchup, black pepper and salt and stir for 1 more min or until tomato becomes soft.

Now add the fried idlis to the above mixture and stir nicely.Then sprinkle garam masala over it and stir again. Serve hot.

Friday, March 30, 2012

Easy Tasty Vegetable Biriyani


One of my favorite one pot meals is the biriyani, there are many versions however this is one of my favorite versions. It takes very little time and very easy to prepare. Hope you will enjoy preparing it too

Ingredients
  • 1 cup rice
  • 1 cup sliced onion
  • 1 cup tomato puree
  • 1/2 cup diced bellpepper
  • 1 cup diced paneer
  • 1/4 cup peas
  • 1/4 cup sweet corn kernels
  • 1 tbsp garlic ginger paste
  • 3 sliced green chillies
  • 2 tbsp chopped mint leaves
  • 3 tbsp chopped cilantro/coriander
  • 1/4 tsp turmeric powder
  • 1 tsp chilli powder
  • 1 tbsp shahi biryani masala
  • salt to taste
Procedure
Soak rice with 2 cups water for 1/2 hr. Add a tbsp of oil , 1/2 tsp salt to the soaked rice, pressure cook the rice with three whistles and 3 minutes in sim and switch it off.

Once it cools open pressure cooker and add 1 tsp ghee and keep aside.

In a deep bottom pan heat 2 tbsp oil and 1 tbsp ghee, add cummin seeds, onions and fry till onions turn translucent, add garlic ginger paste and tomato puree and fry till oil begins to saturate, now add all the veggies and mix nicely and add little water let it cook till it becomes tender.

Now add salt, green chillies, mint leaves, cilantro, red chilli powder,turmeric, shahi biriyani masala and mix nicely.Once oil begins to saturate add the cooked rice and mix gently with the veggies.

Fry the paneer with 1 tsp oil till golden brown and add to the rice. Serve hot with your choice of raitha.

Friday, March 23, 2012

Delightful Rava Laddu


Happy Ugadi to all my blog friends.Today is the telugu new year day and I have been so busy with some personal work for the last couple of months and have not been able to blog. However I felt I should share a recipe that is easy and quick to make.

The rava laddu have a unique grainy flavor and a great companion filling you with a quick burst of energy.So here is the recipe

Ingredients
  • 1 cup rava (sooji/semolina)
  • 1 cup sugar
  • 1/4 cup grated coconut
  • 1/2 cup milk
  • 4 tbsp ghee
Procedure

In a deep bottom pan heat 2 tbsp ghee (clarified butter) and fry the rava till light golden brown. Keep aside

In the same pan heat 1 tbsp ghee and fry the coconut. Stir continuously till light golden brown and mix with the rava.

Heat 1 tbsp ghee and fry the cashewnuts till light golden brown then add the kishmish and fry kishmish till they become fluffy. Add to the rava mixture.

Take half cup sugar and grind it to powder and mix the granulated and powder sugar to the rava.

In a bowl mix half cup milk with half cup water and boil.Keep aside till it becomes warm.

Now in a big plate mix all the above ingredients nicely expect the warm milk.

Take a small palm size portion add milk little by little till it binds firmly into a nice laddu. Repeat the same for all the portions and enjoy your laddus.

Friday, December 16, 2011

Refreshing Multigrain Dal


I learnt this recipe from one of my aunt, it is little different as the end she added raw onions and tomatoes which surprised me very much, it provided a unique texture and color to the dal and did not feel it is uncooked. It was very yummy and preparation was easy too. I am sure you would love to try it

Ingredients
  • 1/2 cup channa dal
  • 1/4 cup green peas
  • 1/4 cup black eye beans
  • 1 cup onions ( 1/2 sliced and 1/2 nicely chopped )
  • 1/2 cup chopped tomatoes
  • 2 green chillies chopped
  • 2 tbsp chopped cilantro (coriander)
  • 1/2 tsp red chilli powder
  • 1 big potato boiled and roughly mashed
  • 1/2 tsp garam masala
  • 1 tbsp garlic ginger paste
  • salt to taste
Cooking Procedure

Soak the grains (channa, black eyed beans, green peas) for one hour and pressure cook them with enough water with 1/2 tsp turmeric powder and 1/4 tsp salt till they become soft. ( For my pressure cooker it took 3 whistles plus five minutes on low flame)

Boil the potato and remove the skin mash it roughly and keep aside

Heat oil in a big pan add 1/2 cup sliced onions and fry till it becomes golden brown, now add the boiled grains and potato and mix nicely. Now add one cup water, garlic ginger paste, red chilli powder and salt. Mix it nicely and it let cook for 10 minutes.

Check the consistency in between if it is hard add little water to make it flowy like dal. Once you feel all the ingredients have blended nicely then add garam masala mix it once then add chopped onions, tomato, green chillies and chopped cilantro. Mix and switch off the flame. Cover the pan for 5 minutes and serve hot with roti or rice.

Friday, December 9, 2011

Freshly Baked Eggless Cinnamon Rolls

These last couple of months I have been very busy with some personal engagements. Now I have the time I thought I can share one of my favorite baking creations. I wanted to make these eggless as I am sure there are lot of you who would want to try this out without eggs. I was pleasantly surprised that they tasted wonderful too ... so here is the recipe

Ingredients
  • 3 1/4 all purpose flour
  • 1 tbsp yeast
  • 4 tbsp butter
  • 4 tbsp sugar
  • 3/4 tsp salt
  • 1 1/4 cup warm milk
  • 1 tbsp olive oil
For spread
  • 4 tbsp sugar
  • 1 tbsp cinnamon
  • 1 tbsp butter
For glaze
  • 1/2 cup sugar
  • 1 tsp vanilla powder
  • 1 tsp butter
  • 3-4 tbsp milk
Stage 1 - Making the dough
Take a large bowl add sugar,salt, butter and yeast and mix nicely.Then add warm milk and let it sit for 10 min. After 10 min add the all purpose flour 1 cup at a time and knead for approximately 5 min or until the dough becomes smooth.Keep the dough aside.

Stage 2 - Resting the dough for baking
Coat the bowl with 1 tbsp olive oil,then place this dough in it and roll it. Cover this bowl with a damp cloth or a cling wrap and let it sit for 1 hr.


Stage 3 - Shaping
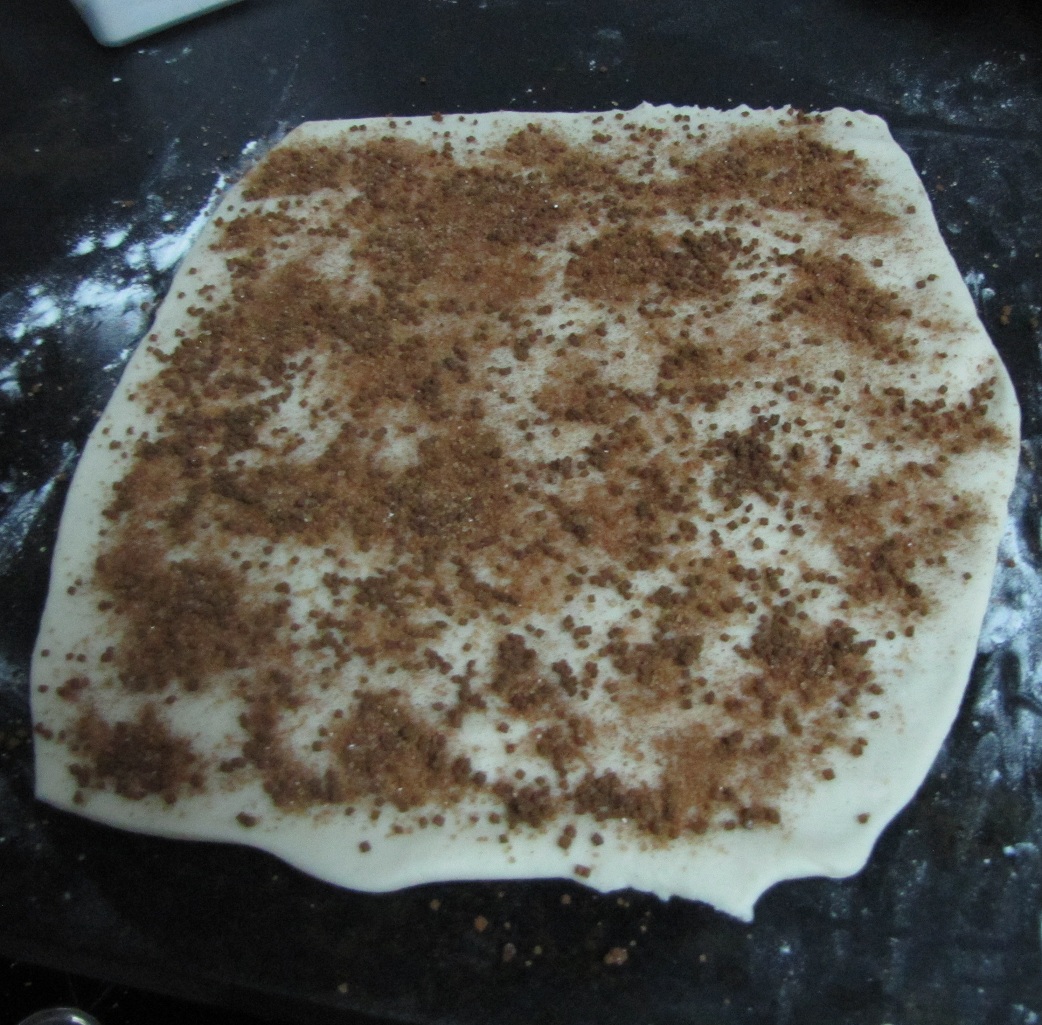
The dough size will double after 1 hr, knead it again nicely and divide it into two parts and spread it with a roller like chapatti and apply butter evenly and sprinkle cinnamon and sugar powder. Then roll it and cut into 1 inch thick swirls. Let is rest for 20 minutes.


( Click all images for enlarged view )
Stage 4 - Glaze Preparation
Preheat the oven for 180 Celsius. In the meantime whisk butter, sugar and milk till it reaches a thick flow-able consistency.

Stage 5 - Baking
Bake the cinnamon swirls for 30-40 min till golden brown. Remove the baking tray and let it cool. Drizzle the glaze over the rolls and let it sit. Serve warm and enjoy the cinnamon rolls.

Note: The temperature of milk should be luke warm to ensure the activation of yeast is perfect. If the yeast does not foam then the yeast is not activated properly, discard the solution and prepare fresh again.

LinkWithin

Related Posts with Thumbnails