Saturday, October 30, 2010

Tangy Mango Dal


Raw mango is available in abundance during summer. It is a classic dal prepared in Andhra, the raw mango lends a unique flavor to the dal, a perfect tangy lipsmacking dal that will leave everybody at home asking for more .... specially my FIL : ) he truely enjoys it. He even claims he can have this dal everyday of the week !!

Ingredients:
  • 1 cup toor dal
  • 1 cup diced raw(unripe) mango
  • 1/2 cup chopped onions
  • 1 tsp oil
  • 1/4 tsp mustard seeds
  • 1/4 tsp cumin seeds
  • 1/4 tsp urad dal
  • 1 tsp crushed garlic
  • 1/4 tsp turmeric powder
  • 2 green chilli sliced
  • 2 red chilli
  • 1 pinch hing (asafetida)
  • salt to taste
  • 3 cups water

Cooking Procedure

Wash the mango,peel it and dice it into small chunks of pieces leave some chunk of mango still stuck with the seed. Keep aside the diced mango pieces with the seed.

Wash the dal with normal water n keep aside.In a pressure cooker heat 1 tsp oil add urad dal,mustard seeds,cumin seeds,hing,turmeric powder n stir till mustard seeds splutter.Then add onion,garlic,curry leaves,green chilli,red chilli n fry for a min.

Now add the dice mango pieces n dal let them fry one more min.Then add three cups of water, salt n close the lid, pressure cook for 3 whistles.Then off the flame.Once it cools open the lid mix it well.Add 1 cup water n let it boil for 5 min. Your dal is ready.

The mango seed chunk can be served with curd rice. Kids will love to hold it and bite a little tangy mango off it.
-----------------------------------------------------------------------------------------------
Tags: Mango, Raw Mango Dal

Friday, October 29, 2010

Délicieux Spinach Mushroom Quiche

( Click for enlarged image )

Are you looking for an exotic one pot meal other than the usual routine ? Look no further as I have a tasty and filling quiche that is made with spinach, mushrooms, and cheese. This is my first attempt trying out a french cuisine and it came out pretty well and here is the recipe. The total process involves
  1. Preparing the base
  2. Preparing the filling
  3. Assembling n Baking
For Quiche Base

Ingredients
  • 1 cup flour
  • Flour for dusting
  • 6 tbsp unsalted cold butter
  • 1/4 tsp baking powder
  • 1 beaten egg
  • salt to taste
Mix the flour,baking powder and salt together nicely. Chop the butter and mix it with flour nicely with ur fingers. When butter incoporates into the flour nicely then add the beaten egg and mix it till it forms a soft round dough.

With a rolling pin making it into a 11 inch dia circle. Carefully shift into the greased pie pan.Press it softly against the pie pan and discard the extra dough on the edge.

Poke some holes into the base with a fork to avoid it to puff when it bakes.Keep it in fridge while u are making ur stuffing.

( Click for enlarged image )

For Filling

Ingredients
  • 1.5 cup sliced mushrooms
  • 1 cup chopped spinach
  • 1/2 onions
  • 2 finely chopped green chillies
  • 1 tsp chilli flakes
  • 1/2 tsp dry basil
  • 1 tsp chopped garlic
  • 1 tbsp olive oil
  • salt to taste
Heat oil in a pan add garlic,green chilli,onions and fry till onion become golden brown,add mushrooms,spinach,salt and cook for 5 min or till mushroom becomes soft. Evaporate all excess moisture then add chilli flakes,basil and mix nicely.Switch of the stove and let it cool.

For topping
  • 1/2 cup milk
  • 1 beaten egg
  • 1/2 cup grated cheese ( i used cheddar and mozzarealla cheese)
  • 1/4 tsp salt
  • 1/4 tsp pepper
For topping, in a bowl beat the egg nicely,add milk, grate cheese salt pepper and mix nicely and keep aside

For Assembly

Preheat the oven 350 F.

Take out the quiche crust from the fridge. Spread the mushroom stuffing evenly. Then pour the milk mixture on top of it evenly. It is should be 1/2 cm below the top edge.

( Click for enlarged image )

Put it in oven and bake it for 40-45 min or till the crust become golden brown and the topping too.After baking pull it out from oven and let it rest for 10 min. Slice it and enjoy.

Note: You can avoid egg by adding 1/2 cup grated cheese while making Quiche base n add more cheese on the top before baking

I am sending this to Champa's Bake off event
____________________________________________
Tags: Quiche, Spinach, Mushroom

Wednesday, October 27, 2010

Brussel Sprouts In Peanut Gravy

( Click image for enlarged view )

Brussel sprouts in one of my favourite veggies after coming to US. I love this veggie as it has got a nice crunchy , mild sweet flavor and looks like a mini cabbage.

I had already posted one version of brussel sprouts curry. This time I wanted to make something with more gravy and goes well with roti or rice. In this curry brussel sprouts is cooked with tomato n onions and simmered in a creamy and delicious peanut gravy.

Preparation Time :15 min
Cooking Time : 30 min
Serves 2

Ingredients
  • 12-15 Brussel sprouts
  • 1/4 cup peanuts
  • 1 tbsp sesame seeds
  • 1 cup chopped onion
  • 3/4 cup chopped tomato
  • 1/4 tsp cumin seeds
  • 1 tsp coriander powder
  • 1/8 tsp sugar
  • 1/4 tsp turmeric powder
  • 1 tsp garlic ginger paste
  • 3 red chillies
  • 2 tbsp oil
  • pinch of hing
  • salt to taste
Cooking Procedure

Wash the sprouts and cut the bottom which is hard and remove the outer leaves and again wash

( Click image for enlarged view )

Cut each brussel in 2 parts along the length or in quarter depending upon size, heat one tbsp oil in a pan and shallow the brussel sprouts for 3 to 4 min or till it light golden brown.Keep it aside.

In the same pan heat 1 tsp oil add peanuts and fry till they start changing color, add sesame seeds and fry for 30 seconds then add red chilli and fry till sesame seeds change color. Immediately shift it to a plate and let it cool. Once it cools blend it to a nice powder.

Heat oil in a pan, add cumin seeds when it splutter, add onion garlic ginger paste,turmeic powder and stir till light golden brown. Add tomatos and cook till soft.Add the coriander powder,hing,sugar,salt and stir until oil saturated out of gravy.Then add brussel sprouts and stir n blend the mixture with the brussel sprouts.

Now add the peanut powder mixture and stir nicely and add 1 cup water. Let is simmer on medium flame and stir occasionally till brussel sprouts are soft.Add water if required. After 15-20 min the brussels will be soft and your is ready, take it off the flame.

Serve hot with roti or rice.

Note:
  1. To adjust the consistency add water to the gravy and keep stiring frequently to prevent the sprouts from sticking to the vessel.
  2. You can also microwave for 10 min to cook the brussels instead of cooking on the flame for the last 15 min. But you need to stir every 3 min in microwave.
  3. In place of brussel sprouts u can use any other veggie like eggplant, bell pepper, paneer, mushroom.
  4. Brussel sprouts is available in spencers food mall in chennai too
____________________________________________________________________
Tags: Brussel sprouts, Peanut, Curry

Tuesday, October 26, 2010

Chocolate Topped Coffee Cake


(Click image for enlarged view)

I bookmarked this delicious cake from the chef in you blog. It is a soft moist cake with a combination of chocolate topping and coffee flavor.I made it with a little variation instead of toffee I used chocolate for the topping. I am sure you will enjoy it.

Ingredients
  • 1 cup all purpose flour
  • 1/2 cup whole wheat flour
  • 1/4 tsp baking soda
  • 1/2 tsp baking powder
  • 1/8 tsp salt
  • 3 tbsp butter
  • 3 tbsp oil
  • 1 cup brown sugar
  • 2 eggs (room temperature)
  • 1/4 cup cold strong coffee
  • 1 tsp vanilla extract
  • 1/2 cup curd
  • 3 oz milk chocolate

(Click image for enlarged view)

Baking Procedure

Preheat the oven at 325 F.

Mix the two flour,baking soda, baking powder and salt in a large bowl.

In another bowl beat the egg and sugar for 3 min till it becomes fluffy then add butter,oil,vanilla extract and blend nicely.Now add the coffee and whisk it nicely.

Then add 1/4 cup yogurt and 1/2 of the flour and mix it nicely and then again add the remaining 1/4 cup yogurt and the flour, beat it until the batter is smooth and creamy. Now spread the batter in a greased 9 inch round pan.

Bake it in oven for 40 to 50 min depend upon oven.Till it becomes golden brown. Meanwhile while it bakes chop the chocolate in small pieces and keep it ready.

Once the cake is done remove the cake from the pan on a cooling rack, sprinkle the chocolate and let it cool. After it completely cools enjoy ur cake.

Note:
  1. The chocolate will melt very fast if its too hot, so let it be warm when u sprinkle the chocolate.
  2. In place of 2 eggs u can also use 4 egg whites.

I am sending this cake to

T&T -Chef in you guest hosted by Priya, event by Lakshmi.

Champa's Bake off event


________________________________________________________________________________
Tags: Cake, Coffee Cake, Chocolate Coffee Cake

Monday, October 25, 2010

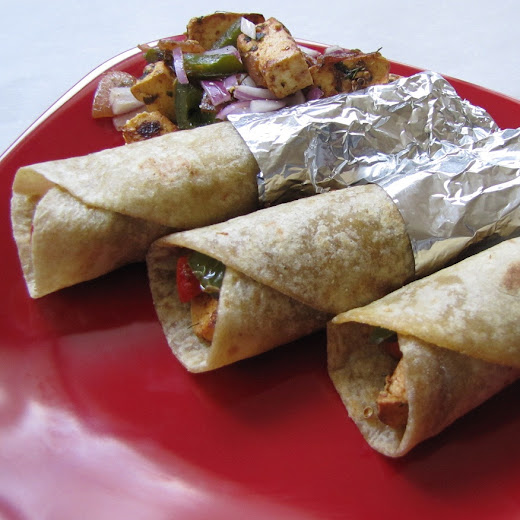
Paneer Achari Kati Roll


(click image for enlarged view)

Kati roll is a street-food originating from Kolkata, India. Originally kati means stick in bengali and kababs very prepared on the stick and then the kababs were used as a stuffing within the paratha and the generic name of Kati Kabab or Kati Roll got stuck with it. The street vendors have a lot of variations with diffent fillings and sauces.

For my version of kati roll I used paneer, bell pepper, onion blended with minimum spices and flavored with pickle for the stuffing. This is a very simple version which can be prepared very quick and easily. For the masala I used crushed coriander and cumin which gives it a unique flavor and the magic ingredient is the pickle (achar) found in every indian home.

Ingredients
  • 6 roti ( I used some rotis which are in fridge)
  • 1 cup diced paneer (cottage cheese)
  • 3/4 cup diced bell pepper
  • 3/4 cup sliced onion
  • 3/4 cup tomato
  • 1 tsp kasuri methi
  • 1 tsp coriander seeds
  • 1/2 tsp cumin seeds
  • 1/2 tsp pickle paste (I used mango pickle/achar)
  • 1 tbsp oil
  • salt to taste
  • sliced onion for serving

(click image for enlarged view)


Cooking Procedure

Make a coarse powder of coriander and cumin seeds.

Heat oil in a pan add the onions and saute for 1 min, then add bell pepper and stir.Add the salt and fry a little more and bell pepper should be slightly cruchy. Add tomato and saute for 1 min, now add the crushed coriander and cumin seed powder and fry. Then add paneer cubes and kasuri methi, blend the paneer nicely with the spices.Stir for 1 min, then add the pickle paste and mix nicely and fry for 30 seconds and remove.

Making the kati roll

Warm the roti on a tawa/skillet.Take 2 tbsp of stuffing and place it in the roti lengthwise in the center, sprinkle some onion slices and roll it . Wrap the bottom with a silver wrap and fold the end and serve hot and enjoy.
_________________________________________________________________
Tags: Kari Roll, Wrap, Paneer, Cottage Cheese

Saturday, October 23, 2010

Multilayered Quesadilla With Corn Salsa

( Click image for enlarged view )

A quesadilla ( tortillas with a cheese-based filling ) is basically a mexican-style stuffed paratha.It is very yummy. It is served with guacamole, corn salsa and sour cream. I made multilayered quesadilla with one layer of beans and another with veggies.

I got the inspiration from Sushma Mallya blog, when I saw this recipe in her blog I immediately bookmarked it. And yesterday I got a chance to make it for dinner.Its tasty,healthy and filling too. It is a perfect one pot meal. Thank you Sushma...

I also made the tortillas, a little healthy version by adding wheat flour and prepared corn salsa to have it as a side for this quesadilla.

The total procedure to make multilayered quesadilla requires
  • Making the tortilla
  • Preparing the stuffing
  • Making the quesadilla
Preparing the tortilla

Ingredients
  • 1 cup all purpose flour
  • 1 cup wheat flour
  • 2 tbsp cold butter
  • a pinch of salt
Cooking Procedure

Mix both the flour with salt,then add the butter and crumble with ur hands and mix nicely my by adding little by little water and make a soft dough.Let it rest for ten minutes.

After ten min knead the dough into a smooth ball and then divide the dough into six parts.Make them into small balls, with a rolling pin roll it into a nice thin circle of 8 - 10 inch diameter and as thin as possible.

Heat the skillet/tawa and it should be hot. Put one tortilla and after 2 min flip it let it cook for 1 min. Both the sides should cook nicely. Repeat the procedure for the rest of tortillas.

Seal it in a large ziplock once they cool for later use.

( Click image for enlarged view )

For Stuffing

Ingredients
  • 1 cup sliced onions
  • 1 cup sliced bell pepper
  • 1/2 cup sliced mushroom
  • 1 cup boiled soft black beans
  • 1 tbsp chopped jalapeño
  • 1 tbsp olive oil
  • 1/2 cup cheese (for sprinkling)
  • salt and pepper to taste
Preparing the stuffing

Heat a pan with 1/2 tbsp oil, lightly mash helf of the black beans, then add all the black beans to the pan and stir fry for 1 to 2 min, Add salt and pepper to taste, keep it aside.

Now again 1/2 tbsp oil again in the same pan, add onions and stir fry for 1 min, then add bell pepper and stir for 30 seconds and them add mushrooms and let if cook with salt and pepper for two minutes.Then check if any excess moisture ans stir till it all evaporates then shift to a plate then mix the jalapeños and keep it aside.

Preparing the quesadilla

( Click image for enlarged view )

Warn three 3 tortillas, then take one tortilla on a tawa, spread the veggies, sprinkle cheese on top of it. Press it nicely and then flip.

Now spread the beans the sprinkle some cheese and put the last tortilla on top of it and press it firmly and flip it carefully and let it cook for 1 min to melt the cheese.

Your quesadilla is ready, slice and serve hot with your choice of salsa, guacamole and sour cream.

Corn Salsa

( Click image for enlarged view )

Ingredients
  • 2 cups corn
  • 1/4 cup finely chopped onion
  • 1/4 cup finely chopped red bell pepper
  • 2 tbsp cilantro
  • 2 tbsp lime juice
  • 1 tsp chopped alepenos
  • 1/4 tsp cumin powder
  • salt to taste
Preparing the corn salsa

If you are using frozen corn thaw it in microwave for 2 min and for 1 min if it is fresh corn.

Mix all the above ingredients nicely in a bowl, cover it refridgerate for 2 to 3 hrs Your salsa is ready to enjoy with quesadilla.

I am sending this quesadilla to Nupur's BB#8-One Dish Meals
____________________________________________________________________
Tag: Quesadilla, Tortilla, Mexican Food, Salsa, Tasty Veggie Quesadilla

Friday, October 22, 2010

Mini Shell Pasta With Tomato Basil Sauce


(click image for enlarged view)

Mini shell pasta is a big favorite at home. They take very little to cook compared to bigger types of pasta and ideal for kids. Earlier I had cooked mini shells with indian spices and it had come out very well and this time I prepared the sauce with tomato and lot of herbs like parsley and basil with some veggies. The flavors get absorbed very well by these mini shells. If you like pasta I am sure you would enjoy this too.

I got inspired to cook this tomato basil sauce from Sunita of Collaborative Curry where she used for her capellini pasta. I modified it slightly to suit my taste. Thank you Sunitha for the wonderful recipe you shared.

Ingredients:
  • 2 cups pasta shells
  • 1/2 cup chopped onion
  • 3/4 cup bell pepper (red n green color)
  • 3/4 cup diced mushroom
  • 1 cup tomato puree
  • 3 tbsp tomato ketchup
  • 1/4 cup chopped parsley
  • 1 tsp dried basil
  • 1 tbsp finely chopped garlic
  • 2 green chilli
  • 1/4 tsp pepper
  • 1/4 cup grated parmeson cheese
  • 2 tbsp olive oil
  • salt to taste

(click image for enlarged view)

Cooking Procedure:

Add a little salt and oil to boiling water,let it boil for 30 sec then add the shell pasta (adding oil prevents the pasta to stick to each other).Let it cook till tender and drain the water and run under cold water for a 1 minute then drain again and keep the pasta aside.

Heat oil in a pan and add garlic, chopped onions and saute for a min then add bell pepper and stir for 1 min. Now add mushrooms, cover and let it cook for 1 min then add tomato puree,chopped parsley and dried basil. Stir and cook in a medium flame for 5 min. Then add tomato sauce,salt and pepper and mix nicely.

Now add pasta to it and stir to blend it nicely. Let it cook for 2 min, switch off the flame, add the grated cheese and stir nicely and serve hot.

I am sending this pasta to Nupur's BB#8-One Dish Meals
__________________________________________________________________
Tags: mini shell pasta, tomato, mushroom, basil, parsley, tomato basil sauce

Thursday, October 21, 2010

Easy and Tasty Mushroom Biryani

(Click image for enlarged view)

Biryani is a delicious Indian rice dish which is often reserved for very special occasions such as weddings, parties, or festive occasions. For biriyani long grain rice (Basmati) is used. Ghee(clarified butter) is used to give it a nice rich flavor. Traditionally it has a lengthy preparation, normally rice and veggies are cooked 70 % separately and then cooked together for the remaining 30% in oven or stove on minimum flame. The purpose of this procedure is to infuse the flavors within the rice.

But sometimes I prefer to make it the easier way with minimum risk. To get the flavors into the rice I cook the biryani and let it sit for 5 hours before serving. This will ensure all the spices infuse the rice.

Biryani is a perfect one pot meal for all occasions .

Ingredients:

For cooking rice
  • 2 cups basmati rice (soaked for 1 hr)
  • 1 inch cinnamon stick
  • 1 bay leaf
  • 5 cloves
  • 1 fist of mint leaves
  • 1 tsp oil
  • 5 cups water
  • 1/4 tsp salt
To marinate veggies
  • 2 cup mushrooms(cut to half if big mushroom)
  • 1/2 cup small cauliflower florets
  • 1/4 cup beans
  • 1/2 cup diced potatoes
  • 1/2 cup diced carrot
  • 1/4 cup peas
  • 2 green chilles
  • 1 tbsp ginger garlic paste
  • 2 tsp coriander powder
  • 1/2 tsp turmeric
  • 1/2 cup chopped mint leaves
  • 1/4 cup chopped cilantro
For Biryani
  • 1 cup sliced onions
  • 1/2 cup diced tomatoes
  • 1 inch cinnamon stick
  • 1 bay leaf
  • 5 cloves
  • 6-7 black pepper
  • 1/2 tsp jeera
  • 2 cardamom (peeled and crushed)
  • 1/2 tsp coriander powder
  • 1 tsp chilli powder
  • 1/2 tsp salt
  • 1 cup curd
  • 1/4 cup chopped cashew
  • 1 tbsp oil
  • 2 tbsp ghee
(Click image for enlarged view)

Step 1 - Cooking the rice

Wash and soak the rice with 6-7 cups water for 1 hour.After one hr drain the water completely and keep aside.

In a rice cooker bowl 5 cups of water when it starts boiling add cloves,bay leaf,cinnamon stick,mint leaves,oil and salt to it.Now add the soaked rice to it.And mix nicely and let it cook.Once it cooks take the lid off and slowly stir it to seperate the rice grains.

Step 2 - Marinating the Veggies and Mushrooms

In a big bowl mix all the vegetables expect mushrooms with 1/2 tbsp ginger garlic paste,1/4 tsp turmeric powder,1/4 cup mint leaves and 1/8 cup colantro and 1 tsp dhania powder, 1/2 tsp chilli powder. Cover and let it sit for 30 min.

In another bowl take mushrooms and mix it with the remaining 1/2 tbsp ginger garlic paste,1/4 tsp turmeric powder,1/4 cup mint leaves and 1/8 cup colantro and 1 tsp dhania powder, 1/2 tsp chilli powder. Cover and let it sit for 30 min.

Step 3 - Preparing the Biryani

Heat oil and ghee in a pan,add all the whole spices mentioned for biriyani and once cumin seed splutter add the cashew and after 1 min add the onions and let it fry till it it turns golden brown, then add chilli powder and coriander powder and then add the tomatoes and saute for a min.

Then add the marinated veggies and let it cook, once it cook 2/3 rd add the mushrooms with salt to taste. Let it cook till all veggies become tender. Now add the curd and cook in low flame let the gravy thicken.

Once all water evaporates add the cooked rice and mix softly and cover and let sit on low flame for 10 min. Stir occasionally every 3 min and your mushroom biriyani is ready. Serve with raitha

Note:
  1. If you using pressure cooker to cook rice add 3 cups of water to 2 cups rice.

  2. Soak rice for 1 hr before starting cooking,to save time while boiling the water begin the marination process for the veggies.

  3. If you are planning to make biryani for a party, to get better taste, prepare the biryani on previous day, once it cool refridgerate it and next day just warm it before serving. This will taste better because all the spices will infuse the rice.This will also give u lot of free time before the party.

  4. If you want the biryani to be more spicy you can adjust the chilli powder according to your convenience.
I am sending this yummy biryani to CMT- Rice hosted by Priya started by Jagruti.
________________________________________________________________
Tags: Biryani, Mushroom, Vegetable Biryani, Easy Recipe, Rice Recipe

LinkWithin

Related Posts with Thumbnails